In the last few years, thousands have flocked to this magical place in the Arizona desert, ever since it became prevalent on social media. It sits on the Havasupai Reservation, deep within the Grand Canyon. Havasu Falls, translated as “blue-green water falls”, is one of the most well-known waterfalls in the world due to its paradise-like views. There are only two ways to get there, hike in or via helicopter (on select days). Since I’m not made of helicopter money, but I do enjoy hiking, I decided to check this off my bucket list. Worth it.


FIRST THINGS FIRST, PERMITS
With popularity comes a price. Before you can hike to the Havasupai Reservation you must obtain a permit, which is virtually impossible to come by. Prior to making my reservation, I had heard about the horror stories of trying to get through to the office. In the previous years, before 2017 season, the only way to secure a permit, was to alternate calling their 4 phone numbers until you got though. With that in mind, I set my alarm clock for February 1st at 9am CT and began calling. I even succumbed to one of those redial apps that would immediately call the number back, if it was busy.
It was nuts. According to my phone, I had called over 400 times on just day 1. That is insane, right? And yet, at the end of the first day, neither I, nor any of my friends, were lucky enough to get through. Turns out, phones were down, as they were working on rolling out a new website (https://www.havasupaireservations.com). Once we discovered that we all hopped on the site to try and secure the permits for our dates, and the person that got to the “confirm” part the fastest, was going to book the trip. So many ups and downs…but we finally did it! After the site logged each of us out and crashed multiple times, we finally were able to breathe again.
UPDATE: In 2018 they sold out of all available permits within 15 minutes! If you’re serious about going you’ll need to stalk their site on opening day, or you might not make the cut!
DIRECTIONS
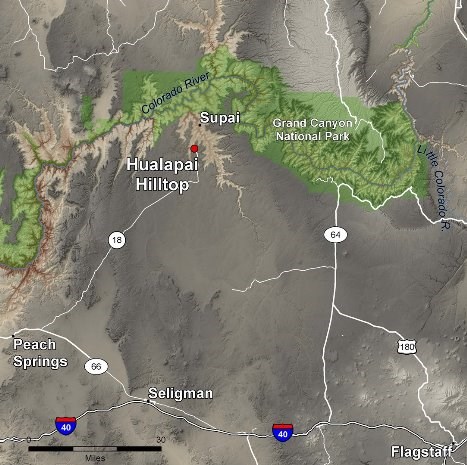 Getting there is actually surprisingly easy. I suggest flying into Las Vegas (3.5 hours) or Phoenix (4.5 hours) the day before and driving most, if not all, of the way there.
From Vegas: Take US-93 S/US-95 S to I-11 and stay on interstate for roughly 107 miles. Merge onto I-40 E/US-93 S toward Flagstaff/Phoenix. Take exit 53 for State Route 66 E towards Peach Springs. Keep your eye out for Indian Rd 18 heading to the left (north), and turn onto it.
From Phoenix: Take the I-40 Business Exit, Exit 123, toward AZ-66/Seligman/Peach Springs. After about 22 miles you’ll see the Grand Canyon Caverns Inn on your left. Keep your eye out for Indian Road 18 heading to the right (north), and turn onto it.
Once you make that turn, you’ll just stay on the dirt road for about 45-50 minutes until you reach the parking lot. Oh, and watch out for cows!
LODGING BEFORE THE HIKE

You can sleep in your car, camp by the hilltop or stay at a nearby motel (there aren’t many). We opted for the motel, to try and get some Zz’s prior to the longest hike any of us have ever done. We stayed at one of the only two (or maybe three) motels in Peach Springs, the Grand Canyon Caverns & Inn.
The motel part closely resembled the motel from the horror movie ‘Vacancy’. You know, the one where Kate Beckinsale and Luke Wilson are forced to stay the night at a remote motel and things go horribly wrong? Yea. Luckily nothing went wrong and everything from check in to breakfast was seamless. We had a great laugh about it though. All that being said, I would highly recommend this place!
PARKING
Once you reach the hilltop parking lot, your next challenge is going to be finding a parking spot. If you get there too early in the morning, you might be forced to park ways up the road. If you oversleep, like we did, you will get there at the perfect time when other hikers are getting back! We scored a close spot and started gathering everything up. Car locked. Keys secured (you do not want to lose those). Off we went.

THE HIKE
 Like many others, we decided to hike in early in the morning to beat the heat of the day and be in the shade for most of the hike. During the hot summer months (May thought September), I would suggest hiking as early as you can. I think we got to the hilltop and were ready by 8am (that’s mainly because we overslept…we wanted start around 5 or 6am). Closer to noon, it got pretty steamy in the canyon.
The hike starts off with a steep set of switchbacks that descend roughly 2000 feet into the canyon bed. The second mile will take you through the exposed “wash” before you enter the canyon. This is great, because you get lots of shade in the morning with occasional breeze. Once you see the “SUPAI: You’re almost there” sign, you’ll turn left and follow a creek almost all the way to the village. Total distance from the hilltop to the village is about 8 miles.

From Supai, the trail continues for another 2-3 miles past Navajo (only get this with a detour) and Havasu and into the designated camping area. The hike itself (once at the bottom of Grand Canyon) is actually pretty easy. One thing to note is the wonderful smell that will follow you all the way to Supai. They run the mules back and forth multiple times a day, so you can probably imagine what I’m talking about here…The hike took us roughly 5 hours. And boy did it feel good to soak our feet in the river!
SUPAI VILLAGE
 Once you reach the reservation, you will need to check in at a little establishment on the left. There, you will get a permit for each person on the reservation. You will be asked to attach those to your backpacks to be displayed at all times. And they do check those permits and the dates, so don’t forget to attach them to your day packs once at the camp ground.
While in town, stop at the store, to grab any last-minute drinks and snacks. Also, don’t miss out on their Indian tacos at the Havasupai Tribal Café. They were pretty expensive, but they were BOMB! Or maybe that’s the 8mile hike talking? This might be last and only place you will get signal, so if you plan on checking in with anyone, do it then! There are plenty of signs at this point to guide you out of the village. What we found somewhat frustrating is the lack of signs once you’ve passed the village. This is where we took an accidental detour through the Navajo falls and added about 1 extra mile to our already looong trip. When you see a split in the road and there is a small path on the left and a much, much larger road on your right, take the path to the waterfalls (left) or continue on the main road to get to your destination faster!
After what felt like eternity, we finally made it. And it was so much more than what we expected. It’s really nice when a place exceeds your already high expectations!


Water

I would recommend NO LESS than 2 liters for the hike in. If you’re hiking mid-day during the summer months, no less than 3! The canyon gets pretty hot, even in the mornings. There is a fresh spring that you can use to refill at the actual campground, so don’t worry about carrying enough for the entire trip! Note, however, that the spring at the campground isn’t guaranteed to have clean water, so I suggest either bringing a lifestraw or water purifier tablets…just in case.
Things that I learned I couldn’t live without!
You can go on just about any other blog/site and get the essentials list (backpack, sleeping bag, sleeping pad, camping stove, etc etc). I just want to highlight a few things that I thought were much more important to me than others (common sense items excluded).
 – Water shoes or sandals. Literally the most important thing to not forget if you plan on exploring the area and hiking down to Mooney Falls and Beaver Falls.
Things to leave at home:
– Pets. This is not a pet friendly hike. Aside from the heat and an extremely long hike, Havasu is already home to dozens of dogs and cats. They simply will not allow any more furry visitors.
– Alcohol. This is probably going to be a tough pill to swallow for those of you who enjoy drinking ice cold beer while camping, but alcohol isn’t allowed. If you plan on sneaking it in, that is on you, but there are signs everywhere that ask you not to bring it. There are also people who walk by to check your permits. I have heard that someone actually go kicked out after getting caught.
Some more pictures from this trip:


Leave a Reply